
Hardwood floor sanding and refinishing is tricky work because if you make a mistake, and it will show. However, it’s a task that pays dividends by restoring the beauty of the floor and adding to its lifespan and is probably best left to a professional. However, if you think that you’re up for it, read on to learn how to refinish a hardwood floor…
1. Be Sure to Clear the Workspace
Remove all furniture, rugs, baseboards, and any other items that might get in the way. Also, schedule a time for the project at which you do not need to use the room for several days. It will save you a lot of frustration later on. You will also need to put up plastic sheeting to prevent the spread of dust throughout your home. Be sure to choose the right type of plastic, based on the desired durability. Also, cover up vents to keep dust at a minimum.
2. Aquire a Respirator and Other Safety Equipment
Hardwood floor refinishing and sanding generates a large amount of dust and fumes. Stock up on dust masks, and earplugs and, when applying sealers and oil-based polyurethane, wear NIOSH-approved organic vapor respirators, neoprene or vinyl gloves, and eye protection with splash guards.
3. Find a DIY-Friendly Sanding Machine and Start By Sanding the Floor
Before you can restore your floor you first need to remove the existing finish and make repairs as necessary.
We recommend an orbital sander vs a drum sander. Random orbital sanders are the best choice for DYI wood floor refinishing. Although they do take longer to remove old finishes than drum sanders, they do not require a lot of experience. They are also less likely to damage your wood floor. With a random orbital sander, you can move with or against the wood grain, just be sure to keep the sander level at all times. But beware, even an orbital sander can “run away” from you and cause sander markings that are very difficult to remove. Click here to learn more about random orbital sanders.
- Begin with coarse-grit sandpaper sufficient to remove the old finish and most surface scratches. Avoid using grits coarser than 60; this will prevent you from damaging the floor.
- Proceed with abrasives that are gradually finer until you reach the desired degree of smoothness. (My preferred progression for a hardwood floor such as oak begins with 60-grit abrasive, goes to 80-grit, and finishes with 100- or 120-grit.)
- Move the floor sander as though you are mowing the lawn. Proceed row by row, overlapping runs by half the sander’s width. You will have to make numerous passes with each grit.
- Don’t forget the corners. A palm sander may be used to sand near walls, but use a sharp scraper or putty knife to remove any old finish areas the sander may miss. Scrapers allow you to get into recesses (along edges, at butt joints) without having to remove a lot of material with the sander.
Sanding your floors is one of the most critical steps to refinish hardwood floors because it removes the old top varnish, and stain, and turns your entire floor into a blank slate.
4. Make Necessary Repairs
Stripping the wood will remove the top finish and surface scratches and minor dents. Now that you can see the naked floor and assess the damages it sustained it is time to fill in deeper gauges and cracks between the floorboards with a good wood filler. In the case of deep moisture penetration that caused the wood to buckle or mildew you might also have to replace some of the floorboards.
5. Thoroughly Clean the Sanded and Repaired Floor
When you’ve finished sanding, remove all dust by vacuuming and wiping the sanded areas with a tack cloth. There is no denying it, sanding a floor will create a lot of dust and particles which easily can invade your whole home. A professional hardwood floor refinishing specialist will most likely have a dustless sanding machine at his disposal which would eliminate this very problem.
6. Apply a Sealer
A sealer coat is not normally needed, but if your floor takes stain unevenly, it will help with a more even stain coverage. Test for this by applying stain to an area that will not be visible once the furniture is moved back into place. It is essential to apply the sealer evenly. Otherwise, stop marks, and lap marks may show through after staining hardwood floors.
7. Re-Apply Wood Stain Evenly
Now is your chance to change the color of your floor by applying wood stain evenly. Or you may choose to re-stain with the same color. This is not as easy as it may seem, especially over a large area. I find that the best technique involves applying the stain with an applicator to one small area at a time (about 18″ x 3′) and then rubbing off all excess with a rag. Avoid letting the leading edge of your job dry; you will end up with lap marks (stripes). Oil-based stains stay workable longer than water-based.
8. Carefully Apply the Top Finish of Your Choice
 The are many top finishes to choose from: From oil or water-based polyurethane to poly acrylic, Swedish finishes, penetrating sealers, waxes, varnish, and lacquer, just to name the most popular. Consult with a professional to help you select the finish that is best for your floor and will stand up to the traffic.
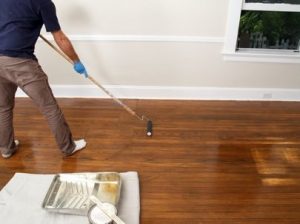
Polyurethane is probably the most used top finish and many pros pour it along the floor and then spread it with an 18-inch lamb’s wool applicator. A better way for the do-it-yourselfer is to roll on the polyurethane using a foam roller, preferably a high-density foam roller. The coat will be thin, even, and will quickly dry to a glassy smooth finish.
Begin your applications along the wall opposite the door you intend to exit. Work in parallel rows toward the wall with the door. When you get close, you will have to change your work pattern and work from the end walls toward the door. This makes it tough to achieve uninterrupted smoothing strokes, so apply a little extra poly and count on its self-leveling properties for a smooth finish.
In Closing
You should always follow the instructions of the materials that you are using. It goes without saying that you should be careful when lifting equipment and working on the floor. Like any other home improvement project, you will need to take precautions to avoid back injury when transporting sanders from the rental store to your house (or upstairs) by always having a helper. Use ramps to move the machine whenever possible. Similarly, get help moving heavy furniture out of the room. You also need to use proper form when bent over sanding, applying varnish or cleaning up throughout the project.
As you can see, refinishing a hardwood floor is a multistep process that can last for several days. Plus, each step must be done perfectly for a satisfactory outcome. There are no shortcuts and it is back-breaking work. That is why we recommend that you hire a professional rather than attempt to do it yourself. West Coast Floor Company is a much thought-after hardwood floor refinishing specialist that makes their services available in the San Francisco Bay. Give us a call for an estimate at (707) 864-2199.